Mechanic quoted me $150 to flush radiator coolant. Seemed expensive for basically replacing fluid.
Looked up how to do it. Seemed straightforward – drain old coolant, add new coolant. How hard could it be?
Tried it myself. First time was messy and took 3 hours including cleanup and panicking when I couldn’t find drain plug. Second time took 45 minutes and went smooth.
Saved $150. Now I do it myself every two years. It’s really not complicated once you figure out where everything is.
The Short Answer
Yes, you can flush radiator coolant at home. It’s not difficult.
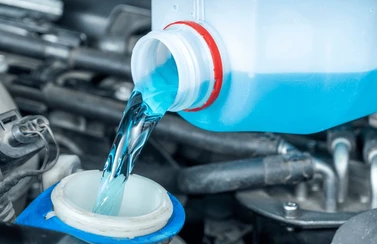
Drain old coolant from radiator drain plug, flush system with water, add new coolant mixed 50/50 with distilled water. Takes 1-2 hours first time.
Need: drain pan, funnel, new coolant ($15-25), distilled water ($3-5), basic tools. Total cost: $25-40 vs $120-180 at shop.
I’ve done this probably five times now on different cars. Save money and it’s easier than oil change honestly.
Why Coolant Needs Changing
Coolant doesn’t last forever. It breaks down over time.
What happens:
- Additives deplete (anti-corrosion, lubricants)
- pH changes, becomes acidic
- Starts corroding engine internals
- Loses ability to prevent freezing/boiling
- Turns rusty brown color from corrosion
Manufacturer recommendations:
- Traditional green coolant: every 2-3 years or 30k miles
- Extended life (orange/red): every 5 years or 100k+ miles
- Check your manual for specific interval
I was at 6 years with original coolant. It was rusty brown instead of green. Way overdue.
Changing it myself cost $30. Mechanic wanted $150. Easy decision.
My First Time Doing This
Started confident. Got humbled quickly.
Hour 1 – Couldn’t find radiator drain plug. Looked everywhere. Finally found it after YouTubing video for my specific car.
Hour 1.5 – Drain plug was stuck. Broke plastic trying to loosen it. Panicked. Eventually got it with pliers.
Hour 2 – Coolant went everywhere. Catch pan too small. Made huge mess in driveway. Neighbor probably judged me.
Hour 2.5 – Tried to add new coolant. Couldn’t figure out why it wasn’t flowing in. Air lock. Had to burp system.
Hour 3 – Finally done. Car running fine but I was exhausted and covered in coolant.
Second time – 45 minutes. Way easier knowing what I was doing.
First time is learning experience. Don’t get discouraged. It gets way easier.
What You Actually Need
Essential supplies:
- New coolant (1-2 gallons depending on car) – $15-25
- Distilled water (1 gallon) – $3-5
- Large drain pan (5+ gallon capacity) – $15-25 if you don’t have one
- Funnel – $3-5
- Basic tools (pliers, screwdriver) – you probably have these
Nice to have:
- Radiator flush solution – $8-12 (helps clean system)
- Garden hose with gentle spray
- Work gloves – hands get dirty
- Old towels – for spills
- Coolant tester – $5-10 (check freeze protection)
Don’t need:
- Fancy equipment
- Air compressor
- Special tools (usually)
Total cost: $25-50 depending on what you have.
I already had tools and drain pan. Spent $28 on coolant and distilled water.
Finding The Drain Plug
This is first challenge. Every car is different.
Where to look:
- Bottom of radiator (most common)
- Lower radiator hose (sometimes has drain there)
- Engine block drain plugs (some cars have these too)
Finding it:
- Google “[your car year/make/model] radiator drain location”
- Watch YouTube video for your car
- Look for small plastic wingnut or bolt at bottom of radiator
Mine was plastic wingnut on passenger side bottom of radiator. Couldn’t see it without getting under car.
Took 20 minutes to find first time. Now I know exactly where it is.
The Actual Process Step-By-Step
Step 0: Let engine cool completely
- Wait at least 2 hours after driving
- Never open hot cooling system – pressure can spray boiling coolant on you
- I learned this by nearly burning myself. Don’t be me.
Step 1: Locate and access drain plug
- Might need to remove plastic underbody panels
- Have flashlight ready
- Position drain pan under drain plug
Step 2: Open radiator cap
- Only when engine is cool
- This allows air to enter so coolant can drain
- If you don’t do this, coolant drains super slowly
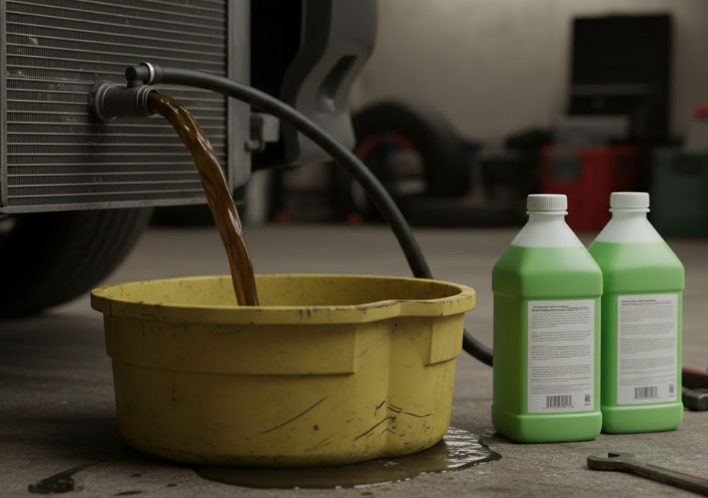
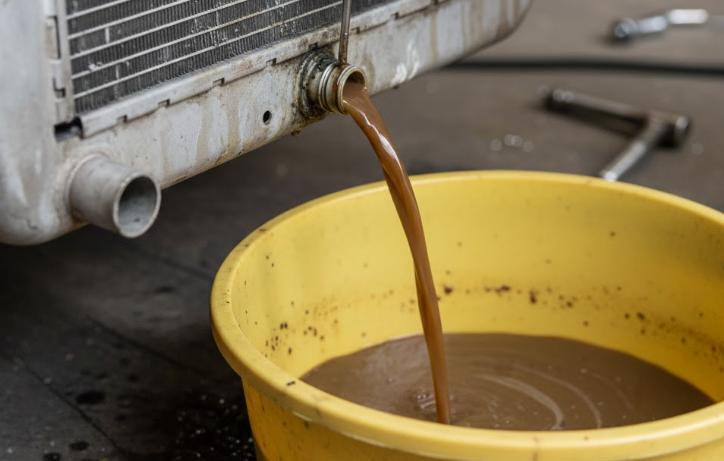
Step 3: Open drain plug
- Turn counterclockwise (usually plastic wingnut)
- Let coolant drain into pan
- Takes 5-10 minutes to fully drain
- Coolant will be rusty/dirty if overdue
Step 4: Flush with water (optional but recommended)
- Close drain plug
- Add distilled water to radiator
- Start engine, let run 5 minutes with heat on high
- Drain water
- Repeat 2-3 times until water comes out clear
Step 5: Close drain plug
- Hand-tight is usually enough for plastic plugs
- Don’t over-tighten or you’ll crack it
Step 6: Add new coolant
- Mix 50/50 coolant and distilled water (some come pre-mixed)
- Pour slowly into radiator
- Fill until you see coolant at top
- Squeeze hoses to help release air bubbles
Step 7: Burp the system
- Start engine with radiator cap off
- Let run until thermostat opens (coolant level will drop)
- Add more coolant as level drops
- Replace cap when level stable
Step 8: Check reservoir
- Fill coolant reservoir to MAX line
- Check again after driving – might need top-off
Step 9: Test drive and verify
- Drive around, watch temp gauge
- Should stay normal (middle range)
- Check for leaks underneath
- Verify heat works properly
My first time took 3 hours. Now it’s 45 minutes start to finish.
The Burping Process
This confused me first time. Air gets trapped in cooling system.
Symptoms of air lock:
- Coolant won’t go in when pouring
- Heat doesn’t work properly
- Temperature fluctuates
- Coolant level keeps dropping
How to burp:
- Run engine with radiator cap off
- Squeeze upper radiator hose repeatedly
- Rev engine gently
- Watch for bubbles in radiator
- Keep adding coolant as level drops
- When no more bubbles, system is burped
Some cars have bleeder valves to make this easier. Mine doesn’t.
Took me forever to figure out why coolant wasn’t flowing in. Air lock. Once I burped it, everything worked.
Choosing The Right Coolant
Don’t just buy random coolant. Check what your car needs.
Coolant types:
- Green (traditional) – Universal but short life
- Orange (Dexcool) – GM extended life
- Pink/red – Asian vehicles often
- Yellow/gold – Some European cars
- Blue – Some specific applications
Check:
- Owner’s manual for specific type
- Label on coolant reservoir
- Google your car’s coolant requirements
Don’t mix types. Different chemistries don’t play well together.
Concentrate vs pre-mixed:
- Concentrate – $15, mix 50/50 with distilled water yourself
- Pre-mixed – $25, ready to go but more expensive
I use concentrate and mix it myself. Saves $10 and it’s just pouring two liquids.
My Honda needs green coolant. Bought Prestone concentrate for $15.
Why Use Distilled Water
Always mix coolant with distilled water, not tap water.
Why:
- Tap water has minerals
- Minerals cause deposits and corrosion
- Distilled water is pure
- Costs $3 per gallon, worth it
I tried tap water once thinking it wouldn’t matter. Got buildup in system. Had to flush again. Learned lesson.
Just buy distilled water. It’s $3. Don’t be cheap about this.
The Messy Drain Situation
Old coolant goes everywhere if you’re not careful.
Tips to minimize mess:
- Use large drain pan (5+ gallon)
- Position it carefully before opening drain
- Put cardboard under area
- Have towels ready for spills
- Wear gloves – coolant is slippery
Coolant disposal:
- Don’t pour down drain or on ground (toxic to animals)
- Most auto parts stores take old coolant free
- Some cities have hazardous waste disposal days
- I keep in old jugs and bring to AutoZone
My first time I used too-small pan. Coolant overflowed everywhere. Huge mess.
Now I use giant drain pan. Problem solved.
For Different Car Types
Most cars – Process is basically same. Drain, flush, fill, burp.
Some BMWs/Audis/VWs – No drain plug. Have to remove lower hose. More complicated.
Some modern cars – Sealed systems with no radiator cap. More difficult to burp. Might need vacuum fill tool.
Older cars – Usually easier. Simple systems, clear access.
Trucks – Same process but more coolant capacity. Buy extra.
My Honda is straightforward. Drain plug and radiator cap. Easy access.
Friend’s BMW has no drain plug. He pays shop because removing hose is annoying.
Common Mistakes To Avoid
Opening hot system – You’ll get sprayed with boiling coolant. Wait for cool.
Wrong coolant type – Can damage engine. Use correct type for your car.
Tap water instead of distilled – Minerals cause problems. Use distilled.
Not burping system – Air locks cause overheating. Burp properly.
Over-tightening drain plug – Plastic plugs crack easy. Hand-tight is enough.
Forgetting to close drain plug – Yeah, this happens. Check before filling.
Not checking for leaks after – Drive and verify no leaks underneath.
I’ve made half these mistakes learning. The over-tightening one cost me $15 for new drain plug.
When To Use Flush Solution
Radiator flush solution helps clean system before refilling.
Use it if:
- Coolant is really dirty/rusty
- System has been neglected
- You see buildup or gunk
- Overheating issues
Process:
- Drain old coolant
- Fill with water + flush solution
- Run engine 10-15 minutes
- Drain flush solution
- Flush multiple times with plain water
- Fill with new coolant
I used flush solution first time because coolant was disgusting. Water came out brown multiple times before running clear.
If coolant is relatively clean, skip flush solution. Just drain and refill.
Checking Your Work
After filling and burping, verify everything works:
Test immediately:
- No leaks underneath
- Temperature gauge normal
- Heat works
- No weird smells
Check after 1-2 days:
- Reservoir level (might need top-off)
- Still no leaks
- Temperature still normal
- Re-check coolant color in reservoir
My first flush, I had to top off reservoir twice in first week. System still had air working out.
After that it stabilized. Normal behavior apparently.
Cost Comparison
DIY coolant flush:
- Coolant concentrate: $15
- Distilled water: $3
- Optional flush solution: $10
- Total: $28-40
Shop coolant flush:
- Labor: $80-100
- Coolant: $30-40 (marked up)
- Shop fees: $10-20
- Total: $120-180
Savings: $80-150 per flush
Do it yourself twice and you’ve saved enough for nice dinner.
I’ve done five flushes over the years. Saved probably $500-600 total.
Time Investment Reality
First time: 2-3 hours including figuring stuff out, watching videos, making mistakes.
Second time: 1.5 hours because you know the process.
After that: 45 minutes – 1 hour. Quick maintenance task.
Compare to:
- Driving to shop: 15-30 minutes
- Waiting at shop: 1-2 hours
- Driving home: 15-30 minutes
- Total: 2-3 hours anyway, plus $150
Might as well do it yourself, save money, and learn skill.
Tools You Probably Already Have
Most people already have what they need:
- Wrench or pliers
- Screwdriver
- Funnel
- Some kind of container for old coolant
Only thing you might need to buy is big drain pan.
I bought 5-gallon drain pan for $20. Use it for oil changes too. Paid for itself.
Signs You Need Coolant Flush
How to tell coolant needs changing:
- Dark brown or rusty color (should be bright green/orange/red)
- Particles floating in reservoir
- Smells bad or burnt
- Overheating issues
- It’s been 3+ years
Check reservoir:
- Should be translucent and bright colored
- If it’s brown sludge, way overdue
I check reservoir every oil change. Takes 5 seconds.
When it started looking brownish, I scheduled flush for next weekend.
What I’d Tell Someone Doing It First Time
Watch YouTube video for your specific car first. See where everything is located.
Buy correct coolant and distilled water. Don’t cheap out and use tap water.
Let engine cool completely. Seriously. Don’t burn yourself.
Take your time. First flush takes 2-3 hours. That’s normal.
Biggest thing that’ll slow you down is finding drain plug and dealing with air locks. Expect these.
Burp system properly. Run engine with cap off, squeeze hoses, let air escape.
Check for leaks after. Drive around, come back, look underneath.
You’ll probably need to top off reservoir in next day or two. Normal.
You’ll feel accomplished when done and $150 richer.
The Real Answer
Yes, you can absolutely flush radiator coolant at home. It’s not hard.
Takes 1-3 hours depending on experience. Costs $25-40 in supplies vs $120-180 at shop.
Basic process: drain old coolant, flush with water, add new coolant, burp system.
Hardest parts are finding drain plug first time and dealing with air locks. Both are learnable.
I was intimidated first time. Turned out easier than expected. Now it’s routine maintenance.
Saves money and gives you control over what goes in your cooling system.
Same logic as changing your own oil. Shops charge $50-80 for oil change. DIY costs $25.
Coolant flush is even bigger savings. $150 markup on $30 worth of coolant and water.
If you can pour liquid and turn a wingnut, you can flush your coolant.
Don’t let intimidation or “I’m not mechanical” stop you. This is beginner-level car maintenance.
Watch a video, buy supplies, spend a Saturday afternoon doing it.
You’ll save money, learn about your car, and feel capable.
Plus never again will you sit in shop waiting room for two hours reading old magazines while they do something you could’ve done in 45 minutes.