
By Engine Dynamo
Learn how to clean your car dashboard perfectly with this step-by-step guide. Discover the best tools, cleaners, and techniques to make your car’s interior look brand new.
Your car’s dashboard is the first thing you see every time you sit behind the wheel — yet it’s one of the most neglected areas when it comes to cleaning. Over time, dust, sunlight, fingerprints, and even moisture build up, dulling the dashboard’s shine and damaging its surface.
A clean dashboard doesn’t just make your car look better — it helps preserve the material, prevents cracking, and improves the overall feel of your interior.
In this detailed Engine Dynamo guide, you’ll learn how to clean your car dashboard perfectly, step by step, using simple tools and techniques that work for every car type — from luxury sedans to everyday hatchbacks.

1. Gather the Right Tools & Products
Before you start cleaning, having the right equipment makes all the difference. Using rough or inappropriate products can scratch or fade your dashboard. Here’s what you’ll need:
Essential Tools:
- Microfiber cloths (2–3 pieces) – soft, lint-free, and perfect for dust removal.
- Soft interior brush or detailing brush – for air vents and crevices.
- Dashboard cleaner or mild all-purpose cleaner – removes dirt and grime safely.
- Vacuum cleaner with brush attachment – eliminates loose dust particles.
- Cotton swabs or small detailing sticks – ideal for buttons and hard-to-reach areas.
- Interior protectant or UV conditioner – keeps the dashboard looking new.
(Later, you can add Amazon/Daraz affiliate links to each item for monetization.)
2. Step 1: Vacuum the Dashboard First
Start by vacuuming your dashboard. This step removes loose dust, sand, or crumbs before you apply any cleaner.
- Use a soft-bristle vacuum attachment to avoid scratching.
- Gently move over the air vents, instrument panel, and around the steering wheel.
- Don’t forget corners and seams where dirt often hides.
Pro Tip:
Never spray liquid cleaners before removing dust — it’ll turn into muddy streaks and make the surface harder to clean later.
3. Step 2: Wipe with a Damp Microfiber Cloth
After vacuuming, use a lightly damp microfiber cloth to remove surface grime.
- Wring out excess water — the cloth should be moist, not dripping.
- Wipe gently across the entire dashboard in straight lines or small circles.
- For stubborn stains, hold the damp cloth on the area for a few seconds before wiping again.
Avoid paper towels or rough fabric — they can scratch soft dashboard materials like vinyl or leather.
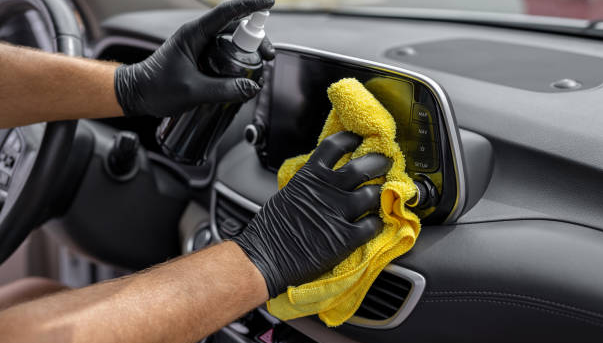
4. Step 3: Apply Dashboard Cleaner or Soap Solution
Now it’s time for deep cleaning. If you have a dashboard cleaner, spray it directly onto a microfiber towel — never straight onto the dashboard.
If you don’t, mix a few drops of mild dish soap with warm water.
Cleaning Method:
- Wipe the surface gently with the damp towel.
- For textured areas, use a soft detailing brush to reach grooves.
- Re-wipe with a clean, dry microfiber cloth to remove residue.
Pro Tip:
Avoid harsh household cleaners or alcohol-based sprays — they can dry out plastic and strip protective coatings.
5. Step 4: Clean Air Vents and Tight Areas
Dust often collects in vents and seams — these are the hardest to reach but make the biggest difference when cleaned properly.
How to Clean Them:
- Use a small detailing brush, paintbrush, or cotton swab to loosen trapped dust.
- A compressed-air can works great for tight spots.
- For sticky residue near buttons or cup holders, dip a cotton swab in mild cleaner.
This level of attention to detail is what separates casual cleaning from a truly professional finish.
6. Step 5: Apply Protectant or UV Conditioner
Once the dashboard is spotless and dry, it’s time to protect it. Sunlight, heat, and UV rays can cause fading and cracking over time — especially in tropical or hot climates.
How to Apply:
- Use a clean, dry microfiber towel.
- Apply a small amount of dashboard protectant or UV conditioner to the cloth.
- Rub evenly in circular motions across the entire surface.
- Buff gently with another dry cloth for a smooth, non-greasy finish.
Important:
Choose a matte or satin-finish product, not a glossy one — shiny dashboards reflect sunlight and create windshield glare.
7. Step 6: Final Polish & Inspection
Now that your dashboard is clean and protected, give it a finishing touch.
- Wipe again with a dry microfiber to remove any excess residue.
- Inspect from different angles under light — it should look clean, uniform, and streak-free.
- Clean nearby surfaces like the steering wheel, gear shifter, and center console for a cohesive look.
Your interior should now feel fresh, smell clean, and look showroom-ready.
8. Quick Maintenance Tips for a Cleaner Dashboard
Keeping your dashboard clean doesn’t have to be a full-day job. Follow these easy maintenance habits to keep it spotless longer:
- Dust once a week using a dry microfiber towel.
- Avoid eating in the car — crumbs attract more dust.
- Use sunshades when parking to prevent UV fading.
- Keep wet wipes or a mini cleaning kit in your glove box for quick touch-ups.
- Don’t over-apply protectant — too much can make the surface sticky.
Consistent small efforts will make your dashboard look like it’s professionally detailed all year round.
9. Bonus: Dashboard Cleaning for Different Materials
Every car dashboard is made from different materials — here’s how to adjust your cleaning method:
Vinyl Dashboards
- Most common in modern cars.
- Use mild cleaners and UV protectants regularly.
Leather Dashboards
- Use leather-safe cleaners and conditioners.
- Avoid excess water; always buff with a dry cloth.
Plastic Dashboards
- Simple soap solution works well.
- Don’t use petroleum-based products — they can make the surface oily.
Carbon Fiber / Glossy Finishes
- Use a soft microfiber only — no abrasive brushes.
- Avoid direct sunlight when cleaning to prevent streaks.
10. Mistakes to Avoid While Cleaning
Even experienced drivers make these mistakes — avoid them for best results:
- Spraying cleaner directly on the dashboard (it seeps into electronics).
- Using alcohol or ammonia-based cleaners (they fade color).
- Ignoring the air vents and corners.
- Applying shiny polish — it attracts dust and causes glare.
- Using old towels or tissue paper that can scratch surfaces.
Keep It Clean, Keep It Classy
Your car’s dashboard sets the tone for your entire driving experience. A clean, well-maintained dashboard not only looks premium but also reflects your attention to detail as a car owner.
With the right tools, gentle techniques, and a few minutes of care, you can make your dashboard look as fresh as the day your car rolled out of the showroom.
Explore more car detailing guides, maintenance tutorials, and product reviews on EngineDynamo.com — your trusted destination for expert car care advice.