Decided I wanted underglow lights on my car about a year ago. Thought it would look cool and be a fun weekend project.
Watched like 20 YouTube videos showing how easy it was. Everyone made it look simple – stick the lights under the car, wire them up, boom done.
Reality was way more annoying than expected. Spent an entire Saturday on my back under the car dealing with zip ties, wire routing, and figuring out power connections.
Got it working eventually and it does look cool. But there’s a bunch of stuff nobody mentions in those videos that would’ve saved me hours of frustration.
Also learned afterward that underglow is illegal in my state while driving. So now I only use them in parking lots and car meets. Wish I’d checked that first.
The Short Answer
Buy a LED underglow kit (around $50-150), mount the strips under the car with zip ties, run power wire to battery, add inline fuse, mount the control box, done.
Takes 2-4 hours if you know what you’re doing. First time expect 4-6 hours with frustration breaks.
Check your state laws before installing. Many states ban certain colors or any underglow while driving.
I used a Xprite kit from Amazon for like $70. It’s been working fine for a year with no issues.
My Installation Experience
Planning phase – Watched videos, bought kit, felt confident. Took 30 minutes.
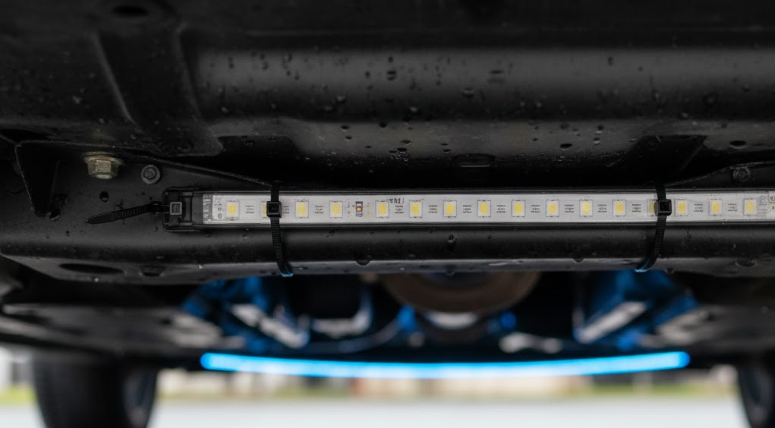
Mounting strips – Laying on garage floor trying to reach under car, zip ties breaking, strips not sticking. Took 2 hours, should’ve taken 30 minutes.
Wire routing – Running wires through chassis, avoiding hot exhaust, making it neat. Took 1.5 hours. Frustrating.
Power hookup – Wiring to battery, adding fuse, mounting control box. Took 1 hour including troubleshooting.
Testing and adjusting – Making sure everything worked, fixing loose connections. Took 30 minutes.
Total: About 5 hours for my first install. Would take maybe 2 hours if I did it again knowing what I know now.
Not super hard but definitely more involved than YouTube made it look.
What You Actually Need
LED underglow kit – Comes with light strips, control box, wiring, remote. $50-150 depending on quality and features.
Zip ties – You need like 50+ heavy-duty ones. The kit includes some but not enough. Get extras.
Wire taps or crimps – For connecting power wire safely. Crimp connectors are better than wire taps.
Inline fuse holder – Essential for safety. Should come with kit but verify.
Electrical tape – For securing connections and protecting from moisture.
Basic tools – Screwdrivers, wire strippers, drill (maybe), wrench for battery terminal.
Jack and stands – Need to lift the car to reach underneath properly. Don’t use just a jack, unsafe.
Shop light or headlamp – You’ll be working under the car in the dark.
I had most of this except extra zip ties. Made multiple trips to Home Depot during install.
Choosing The Right Kit
Don’t buy the cheapest $30 kit. They fail quickly and look terrible.
Don’t buy the $300 premium kit unless you’re building a show car. Overkill for most people.
Mid-range kits ($60-120) work great for normal use. Xprite, OPT7, LEDGlow are decent brands.
Look for:
- Weatherproof/waterproof rating (IP65+ minimum)
- Smartphone app control (way better than RF remote)
- Multiple colors and patterns
- Good reviews mentioning longevity
- Tube-style or strip-style (tube is more durable)
I got Xprite tube-style kit with app control for $70. Good balance of features and price.
Legal Issues You Need To Know
This is the thing I wish I’d researched first.
Most states have laws about underglow:
- Many ban red/blue colors (cop colors)
- Some ban any underglow while driving
- Some allow it if not visible from front/sides
- Some ban flashing modes entirely
- Some states don’t care at all
I’m in Virginia which bans basically all underglow while driving. Can only use it while parked.
Other states like California allow it with restrictions. Some states don’t have specific laws.
Check your state laws before buying. If it’s illegal while driving, decide if you still want them just for shows/parking lots.
Don’t be that person who gets pulled over constantly because you didn’t check legality.
The Mounting Process
This is where YouTube videos gloss over the annoying parts.
Step 1: Plan placement
- Front: Under bumper or along bottom edge
- Sides: Along rocker panels
- Rear: Under bumper or rear diffuser area
- Test fit before mounting anything
Step 2: Clean mounting surfaces
- Use rubbing alcohol to clean where tubes/strips stick
- Dirt prevents adhesive from working
- Let dry completely
Step 3: Mount the strips
- Peel adhesive backing
- Press firmly onto clean surface
- Hold for 30 seconds minimum
- Add zip ties every 8-12 inches as backup
The adhesive on my kit was terrible. Strips fell off within days. Zip ties are what actually hold them.
Don’t trust adhesive alone. Use tons of zip ties. Find mounting points on the chassis and zip tie around them.
I spent probably 2 hours just getting strips mounted securely. They kept falling off or sliding around.
Wire Routing Is The Pain Point
This part sucks and nobody warns you properly.
You need to route wires from each light strip to the control box. Keep wires away from:
- Exhaust (heat melts wires)
- Moving parts (suspension, wheels)
- Road debris (rocks hitting wires)
- Anywhere they can get pinched
Use existing wire channels along frame rails if possible. Zip tie wires every foot or so.
My biggest mistake was running a wire too close to exhaust. It melted after a week and I had to redo it.
Take your time routing wires properly. Rushing this leads to failures later.
Also make sure connectors are protected from water. Wrap them in electrical tape or use heat shrink.
Power Connection Options
You have a few ways to power the lights:
Direct to battery – Most reliable. Positive to battery positive, negative to chassis ground. Add inline fuse near battery.
Tap into fuse box – Easier but riskier. Find an accessory circuit with enough amperage.
Cigarette lighter – Easiest but looks ghetto with wire running inside car. Not recommended.
I went direct to battery with inline fuse. Requires connecting directly to positive terminal and grounding to chassis.
This is the professional way but means working with battery. Disconnect negative first when working on positive.
The inline fuse is critical for safety. If wires short, fuse blows instead of starting a fire.
Make sure fuse is rated correctly for your kit’s amperage. Usually 10-15 amp for LED underglow.
Control Box Placement
The control box needs to go somewhere protected but accessible.
Options:
- Inside cabin under seat
- In trunk/cargo area
- Under hood (if waterproof)
- Hidden under dash
I put mine under the driver’s seat. Easy to access, protected from weather.
Make sure the antenna for the RF remote (if applicable) has clear signal. Inside cabin works best.
If using app control, control box needs power but antenna placement doesn’t matter.
Secure the box with velcro or zip ties so it doesn’t slide around.
Common Installation Mistakes
Using cheap zip ties – They break constantly. Get heavy-duty outdoor rated ones.
Not cleaning surfaces – Adhesive won’t stick to dirty surfaces. Clean thoroughly.
Routing wires near exhaust – They’ll melt. Keep away from hot components.
Skipping the fuse – Asking for electrical fire. Always use inline fuse.
Not protecting connections – Water gets in, lights fail. Seal everything.
Mounting strips where they scrape – Too low and you’ll hit speedbumps. Leave clearance.
Not testing before final install – Test lights work before securing everything permanently.
I made like half of these mistakes. Learn from my screw-ups.
The App Control vs RF Remote Thing
Modern kits come with smartphone app control via Bluetooth. This is way better than RF remotes.
App control:
- Easy color selection
- Save custom patterns
- Music sync features
- Update firmware
- Control from phone
RF remote:
- Loses signal easily
- Limited buttons
- Batteries die
- Easy to lose
- Feels cheap
My kit has both. I only use the app. Remote sits in a drawer.
Spend extra for app-controlled kit. It’s worth it.
Brightness And Color Quality
Cheap kits have dim LEDs and poor color accuracy. “White” looks blue-ish, colors look washed out.
Better kits have brighter LEDs and accurate colors. The difference is noticeable.
My mid-range Xprite kit is pretty bright. Can see colors clearly at night. Not as bright as premium kits but good enough.
If you’re doing car shows you might want premium kit with maximum brightness. For casual use, mid-range is fine.
Don’t expect underglow to light up the ground like daytime. It’s accent lighting, not functional lighting.
Maintenance And Issues
After a year here’s what I’ve dealt with:
Loose connections – Had to retighten a few connectors that loosened from vibration. Easy fix.
Zip tie failures – Some cheap ties broke. Replaced with better ones. Takes 10 minutes.
One strip dimmer – One side is slightly dimmer than others. Probably moisture in connection. Still works though.
Control box issue – Lost Bluetooth connection once. Power cycle fixed it.
Overall pretty reliable. Nothing major has failed. Lights still work fine.
Clean the tubes/strips occasionally. They get covered in road grime and look dirty.
Weather Resistance Reality
My kit claims IP67 waterproof. In practice it’s more like water-resistant.
Lights work fine in rain and snow. No issues there.
But if water pools around connections they can fail. Make sure connections are sealed properly.
I’ve driven through heavy rain many times. Lights still work. The waterproofing seems adequate.
Just don’t submerge them or drive through deep water expecting them to survive.
Different Light Styles
Tube-style – Sealed tubes with LEDs inside. More durable, easier to mount. What I have.
Strip-style – Flexible LED strips. Cheaper, less durable, harder to mount cleanly.
Rock lights – Individual pod lights mounted in specific spots. More expensive, very durable.
For first install I recommend tube-style. They’re the easiest to work with and most forgiving.
Strip-style requires more careful mounting and protection. They’re exposed and can get damaged.
Rock lights are overkill unless you’re building a show truck or off-road rig.
If I Did It Again
Knowing what I know now, I’d:
- Buy better quality kit from start ($100-120 range)
- Get 100+ heavy-duty zip ties before starting
- Take more time planning wire routing
- Use heat shrink on all connections, not just tape
- Mount control box in more accessible location
- Test everything before final installation
- Actually check legality first
Would probably save 2 hours and avoid some failures I had to fix later.
Still, the install wasn’t that bad. Just more tedious than expected.
Cost Breakdown
Underglow kit – $70 Extra zip ties – $10 Additional wire and connectors – $15 Heat shrink tubing – $8 Time – 5 hours
Total: About $100 and a Saturday. Not bad for a cool aesthetic mod.
Professional installation costs $200-400 on top of kit cost. DIY saves significant money if you’re willing to do the work.
What Looks Best
Color choice is personal but some observations:
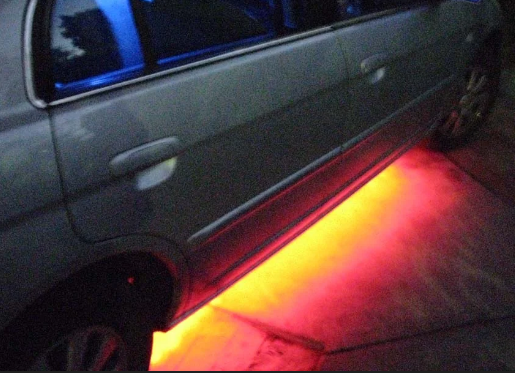
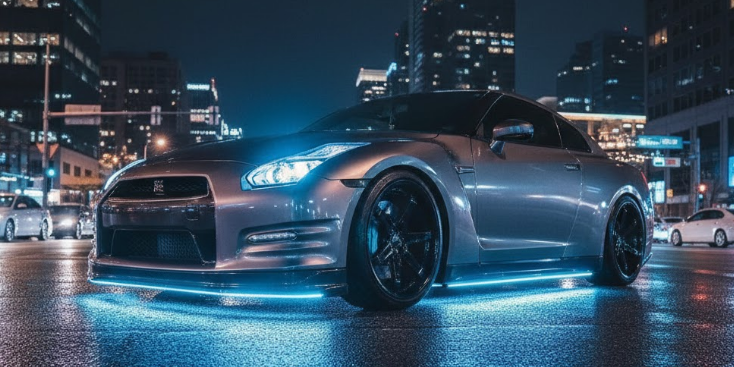
Blue – Illegal as underglow in many states (cop colors). Looks cool but risky.
Red – Also often illegal. Looks aggressive.
White – Legal most places. Clean modern look. My default setting.
Green – Usually legal. Looks unique.
Purple/Pink – Legal and stands out. Not for everyone.
RGB changing – Fun but gets old. I used color changing for a week then settled on white.
I mostly run white because it’s legal while parked and looks clean. Occasionally switch to green for car meets.
The Sound-Reactive Feature
Some kits sync lights to music. It’s a gimmick but kind of fun.
Works okay with heavy bass. Looks flashy at shows.
In practice I never use it. Too distracting and looks tacky on public roads.
Fun to demo once, then you forget about it.
How Long They Last
My lights have been installed for over a year with regular use. Still working fine.
Expected lifespan for decent quality LEDs is 30,000+ hours. That’s years of use.
Cheap kits fail in months. Mid-range kits should last 2-3+ years. Premium kits maybe 5+ years.
The LEDs rarely fail. Usually connections or control box issues happen first.
Treat them well and they’ll last. Bash them on curbs constantly and they won’t.
The Real Answer For DIY Installation
Buy a mid-range kit with app control ($70-120). Get extra zip ties and proper connectors.
Plan your install. Test fit strips, plan wire routing, identify power source.
Take your time mounting strips securely with tons of zip ties. Don’t trust adhesive alone.
Route wires carefully away from heat and moving parts. Protect all connections.
Connect power properly with inline fuse. Test everything before final securing.
Expect to spend 4-6 hours your first time. It’s tedious but not difficult.
Check your local laws before turning them on while driving. Don’t get tickets for illegal lighting.
I’m glad I did it myself instead of paying $300+ for professional install. Saved money and learned how everything works.
But I also won’t pretend it was quick and easy like YouTube suggests. It’s a project that requires patience and attention to detail.
The lights look cool though and I’ve gotten lots of compliments at car meets. Worth the effort if you care about aesthetics.
Just know what you’re getting into. Not a 30-minute job. Set aside a full day and you’ll be fine.